Sunday, December 18, 2016

Gingerbread Muffins


In my personal opinion, ginger is one of those spices that is similar to cloves, a little bit goes a very long way! I don't even keep cloves in my spice cabinet because even a "whiff," of that spice is too strong for me.  Anyways, around this time of the year, gingerbread men/women are a very popular cookie to make. Dominic and I even made some gingerbread people just about a week ago.


Yesterday, in keeping with the gingerbread "theme," my baking assistant (Dominic) and I made some gingerbread muffins. Wow, these smelled so incredible when they were baking! In about a half hour you can have these tasty "gems," on your kitchen table. They are going pretty fast in my house!

Ingredients

2 cups white flour
2 tablespoons baking cocoa
1 teaspoon ginger
1/4 teaspoon cinnamon
1/4 teaspoon nutmeg
1 teaspoon baking soda
1/2 teaspoon salt
1/2 cup unsalted butter, melted
1/2 cup white sugar
1/2 cup unsulphured molasses
1/4 cup milk
2 eggs, beaten

Preheat oven to 350 degrees and fill a 12-cup muffin tin with paper liners. Set aside. In a large bowl, put all the ingredients in the order given and mix until just combined with a large spoon. The batter is kind of stiff, but that's fine. Divide the batter evenly between the paper liners and bake for 20 minutes or until a toothpick inserted into a middle of a muffin comes out clean. Remove to wire rack to cool. Top with powdered sugar glaze if you want (1/4 cup of powdered sugar and 1 3/4 teaspoon water). Makes 12 muffins. Store covered for up to three days.

Thursday, November 17, 2016

Madeleines


About a week or so, I went looking for a new cookie recipe because the holidays are right around the corner. I dug deep into my pile of cookbooks and pulled one out called, "Tante Marie's French Kitchen," from 1949. The gal that translated and adapted it was Charlotte Turgeon, who just so happens to have been a lifelong pal of Julia Child! The two women met in college. I absolutely loved watching Julia Child's show, "The French Chef," that was on PBS. Yep, my love of watching cooking shows goes back a LONG way!! Anyways, after I blew the dust off the top of the cookbook, I found a recipe for madeleines. The only thing about making madeleines is that you need a special kind of pan to bake them in! I went to my local Bed, Bath and Beyond (I love the store, plus I always have a bunch of coupons) and purchased a 12-cavity madeleine pan for about $10.00. I have never heard of a pan with 12 cavities. Maybe the pan needs to go to the dentist. LOL.  Okay, bad joke, I know.  Ladies (and men) who bake, if you don't have one, ask for it for a holiday present!!! The recipe was so simple to make and they turned out pretty well if I do say so myself!!!

Ingredients

4 large eggs
1 1/2 cups white sugar
1 1/4 cups unsalted butter, softened
1 tablespoon lemon juice
2 1/3 cups white flour

Preheat oven to 325 degrees and spray the madeleine pan with non-stick cooking spray and set aside. Get one small bowl and one large bowl. Separate the yolks from the whites of the four eggs. Put the whites in the small bowl and the yolks in the large bowl. Beat the yolks slightly with a fork and add the white sugar and butter. Mix by hand with a large spoon or use an electric mixer until well combined. Add the lemon juice and white flour and combine well again. Gently "fold," in the whites of the eggs and mix until smooth. Pour into each "cavity," making sure it's not filled too full. This recipe makes three dozen cookies. Bake for 20 minutes and let cool five minutes before removing to wire rack to continue cooling. Sprinkle with powdered sugar, if desired.

Thursday, October 20, 2016

No Yeast Cardamom Bread


I am always on the "lookout," for new quick bread recipes.  I recently picked up a bottle of cardamom at the Kroger even though I had NEVER used cardamom in my life!! Being the "bread," gal that I am,  I knew I wanted to make cardamom bread, but many of the recipes out there used yeast. I do keep yeast in my pantry (but I use that for my bread machine). This bread has no yeast, but does include buttermilk. I always have plenty of regular milk, because Dominic goes through a couple of gallons a week, but I typically do not have buttermilk in the fridge. You can easily whip up your own in a matter of minutes. Do you dye eggs around Easter? then you probably have white vinegar somewhere in your pantry. To make what you need for this bread, pour a cup of milk into a small bowl and then add a tablespoon of white vinegar. Set the timer for five minutes. Yep, that's it. When I made this bread this morning, I got the homemade buttermilk going and then mixed up the rest of the ingredients. I made a loaf of this bread earlier in the week (with no icing or walnuts) and there was just one piece left this morning. I now have made this bread both plain and with vanilla icing and chopped walnuts on top (which is the "traditional," way of making it). Both ways were super duper scrumptious!


Ingredients

2 large eggs, beaten
1 1/2 cups white sugar
1/2 cup canola oil
2 1/2 cups white flour
1 teaspoon baking soda
1 teaspoon cardamom
1/2 teaspoon cinnamon
1/4 teaspoon nutmeg
1/4 teaspoon ginger
1 cup buttermilk
  (if you don't have any, put one cup milk and
  one tablespoon of white vinegar in a bowl
  and wait five minutes)

Preheat oven to 350 degrees and spray a  9 x 5 x 3 inch  loaf pan with non-stick cooking spray. Set aside. In large bowl, put the eggs and white sugar and mix well. Add the canola oil and mix well again. Next, put the flour, baking soda, cardamom, cinnamon, nutmeg and ginger. Combine and then add the buttermilk. Mix until smooth and pour into the prepared loaf pan. Bake for 60-70 minutes or until a toothpick inserted into the middle of the bread comes out clean. Remove from oven, let cool on a baking rack and then remove from the pan. Top with vanilla icing and walnuts, if desired. Keeps for up to three days covered at room temperature.

Tuesday, October 4, 2016

Pumpkin Snickerdoodles


One of my dear friends, Melissa, looked at my blog recently trying to find a pumpkin cookie recipe. Finding none, I told her I would try and come up with one! I am ALWAYS up for a baking challenge, so I decided to make pumpkin snickerdoodles! My absolute favorite "trio," of spices (cinnamon, nutmeg and ginger) are in these tasty "gems!" Shortly before I headed over to a disability ministry art event at Melissa's art gallery Sunday a week ago, I whipped up a few dozen cookies, thinking there would be at least a few left over for her to enjoy later with her husband. Well, guess how many were left. ONE!!! You know what that means. Well, it actually means three things, the participants at the art event liked them, since I didn't even get a picture of my first platter of cookies, I had to make some more and I owe Melissa a platter of cookies!


 Ingredients

1 cup unsalted butter, softened
1 cup white sugar
1/2 cup light brown sugar, lightly packed
3/4 cup packed pumpkin
1 large egg
2 teaspoons vanilla extract
3 3/4 cups white flour
1 1/2 teaspoons baking powder
1/2 teaspoon salt
1/2 teaspoon ground cinnamon
1/4 teaspoon nutmeg
1/4 teaspoon ginger

Topping

1/2 cup white sugar
1 teaspoon cinnamon
1/2 teaspoon nutmeg
1/4 teaspoon ginger

In a large bowl, put the butter and white sugar and cream until smooth by hand with a large spoon or with electric mixer. Next, add the light brown sugar, pumpkin, egg and vanilla extract. Mix until well combined. Lastly, add the white flour, baking powder, salt, ground cinnamon, nutmeg and ginger. Mix by hand with large spoon until it turns into a soft batter. Don't over mix. Cover with plastic wrap and put in the fridge for a minimum of two hours. When ready to make, preheat oven to 375 degrees and cover a large cookie sheet with parchment paper. Roll the batter into four dozen balls the same size (a little smaller than a golf ball) and set aside. In a small bowl, put the topping ingredients - white sugar, cinnamon, nutmeg and ginger. Using a small spoon, mix until combined. Roll each ball into the sugar topping mixture, coating the entire ball. Place a dozen at a time on the cookie sheet and using the bottom of a drinking glass, first put in the sugar topping mixture and then press the ball. Bake for 12 minutes and then remove to wire rack immediately to continue to cool.  Store covered at room temperature for up to one week. Side note: parchment paper is my new favorite baking item for cookies. If a recipe calls for ungreased cookie sheets, I use parchment paper. I bought the Kroger "house," brand a while back and I still have several sheets and no "stuck" cookies!!

Monday, September 12, 2016

Strawberry Trifle


When I was trying to tell the hubby that I wanted to make a "trifle," he kept calling it a "truffle." I tried and tried to explain to him that it was two separate things. LOL. Anyways, I was really proud of myself because I barely spent any money on this dessert! I had a digital coupon from Kroger to get a FREE angel food cake and the whipped topping and the strawberries were both on sale!! A "classic," trifle has the cake soaked in sherry or "fortified wine." Um, since Dominic was going to have some of this and he's only 12 years old, that wasn't an option. This trifle had to be "kid friendly!" Even if I hadn't gotten the ingredients for this trifle either free or on sale, it still wouldn't be an expensive dessert to make. I think it's pretty impressive, don't you?

Ingredients

13-ounce angel food cake, cubed
  (about six cups)
8-ounce container of whipped topping
1 pound fresh strawberries, hulled and sliced

In a large glass serving bowl, put two cups of the cubed angel food cake, 1/3 of the whipped topping and 1/3 of the strawberries. Repeat two more times, ending with the strawberries on top. Cover with plastic wrap and put in the fridge 30 minutes. When ready to eat, a large spoon is much better to "scoop," out a piece. Drizzle chocolate syrup on top, if desired!! YUMMY!


Thursday, September 1, 2016

Chocolate Pudding Brownies


Last week, while cleaning out and sorting our food pantry, I came across a few items that had gotten pushed towards the back. I found a bag of Cracker Jacks (yeah!), which were still relatively new and quite tasty and a box of Hershey's Instant Chocolate Pudding. I could have whipped up some pudding, put in this house, brownies rule as one of our #1 desserts, so I opened up the package of pudding and dumped the dry mix into the bowl. I then added the usual ingredients for brownies - flour, sugar, etc., but also added chocolate syrup, milk chocolate chips and chopped pecans. Wow, these brownies are totally scrumptious and decadent!! Triple the chocolate, because you can never have too much chocolate, right?!?!?!?!

Ingredients

1/2 cup unsalted butter, softened
1 cup white sugar
2 large eggs
3.56 ounce box Hershey's Instant
   Chocolate Pudding
3/4 cup white flour
1/4 teaspoon baking powder
1/4 teaspoon salt
1/2 teaspoon vanilla extract
2 tablespoons milk
1 tablespoon chocolate syrup
1/2 cup milk chocolate chips
1/2 cup pecans, chopped

Preheat oven to 350 degrees. Spray a 9x9 inch pan with non-stick spray. In large bowl, put the butter and sugar. Cream by hand with large spoon or with electric mixer until smooth. Add the eggs, box of pudding mix, flour, baking powder, salt, vanilla extract, milk and chocolate syrup. Combine well and then "fold," in the chocolate chips and pecans with a large spoon. Pour into the prepared pan and bake for 35-40 minutes or until a toothpick inserted into the middle comes out clean. Cool and then cut into squares.

Thursday, August 18, 2016

Henrici's Coffee Cake


I found this coffee cake recipe in an American-Slovene Club cookbook from 1951 that was published in Cleveland. After TONS of research on the Internet, I found out a few interesting facts - Henrici's was a German bakery/restaurant in Chicago that opened in 1868 and closed permanently in 1962. How a recipe from a German bakery/restaurant in Chicago landed in an American-Slovene Club cookbook in Cleveland remains a mystery. I'm guessing that the coffee cake recipe was probably kept a secret, and people tried to replicate it. There are variations - you can add nuts or raisins, which I chose not to do. The recipe out of the American-Slovene Club cookbook also said use a "pinch of salt." What exactly is a pinch? I used 1/4 of a teaspoon and that seemed to work.  All the recipes I found had lemon extract, lemon rind or lemon juice in some way, shape or form. I don't think I have ever bought lemon extract in my entire life and I rarely have a lemon on hand. So, that left one item I did have, the lemon juice! Some recipes said use one teaspoon and others said use a tablespoon. An entire tablespoon of lemon juice seemed like a lot, but I ended up using that much! This coffee cake smelled so yummy while it was baking. If you notice a few cracks on the top, it's because I was impatient and tried to remove the coffee cake from the pan before it had cooled enough. Well, I was hungry and wanted it for breakfast! I can tell you this, it was so moist and delicious. I love, love, love recipes that have some sort of history to it, it makes baking even more fun! I did find a copy of a 1948 menu from Henrici's on the Internet, but didn't see the coffee cake on there. I did discover they had their own special blend coffee with whipped cream. Guess how much? Just 15 cents a cup!  Wow, imagining a cup of that coffee with a slice or two of coffee cake is making me hungry! I gave a piece to the hubby in his lunch today - he just sent me an e-mail, "the coffee cake you made was really great.  On a 1-10 scale, I would give it an 11!" I love it when that happens.


Ingredients

3/4 cup unsalted butter, softened
1 cup white sugar
3 large eggs
3 cups white flour
3 teaspoons baking powder
1/4 teaspoon salt
1 cup milk
1 tablespoon lemon juice

Preheat oven to 350 degrees and spray a 12-cup fluted tube or Bundt pan with non-stick cooking spray. Set aside. In a large bowl, put the butter and white sugar and with an electric mixer or large spoon, combine until creamy. Add the remaining ingredients and mix until smooth. Pour into the prepared tube pan, spread the batter evenly and bake for 50-55 minutes or until a toothpick inserted into the coffee cake comes out clean. Remove pan to wire rack and when cool, invert onto a plate. Sprinkle with powdered sugar if desired.

Saturday, August 13, 2016

"Anytime" Blueberry Cobbler


This time of year, blueberries are cheap and abundant where I live here in Michigan. What do you do when you get tired of putting them on cereal? or using them in muffins? Well, you make them into a cobbler!!!  This morning, I was gathering my ingredients together in the kitchen, when I heard my husband's voice from the other room saying, "what are you making in there?" I told him I was making a cobbler. It didn't take too long to assemble and then I put it into the oven to bake. When I had pulled the cobbler out and it had just been cooling a few minutes, again I heard my hubby's voice. This time he said, "is it ready to eat?" I put some on a plate and handed it to him. After he polished his piece off, I asked him, "so, what would you give the cobbler on a scale of 1-10?" He said, "11." Cool. I was telling him that the warm cobbler would be so good topped with my homemade vanilla ice cream for dessert. His response, "I've always thought of a cobbler as a "breakfast," item." Yes, after being married over 20 years, these are the kind of conversations my husband and I have on a Saturday morning. 


To me, this blueberry cobbler is good "anytime," whether it's morning, noon or night!

Ingredients

Filling:

2 cups (1 pint) blueberries, fresh
 (rinsed and patted dry)
1/4 cup white sugar
3 teaspoons lemon juice

Topping:

2 cups white flour
1 tablespoon baking powder
1 teaspoon salt
2 tablespoons white sugar,
  one tablespoon reserved for topping
1/3 cup shortening
3/4 cup milk

Preheat oven to 375 degrees and spray a 9-inch round pie pan with non-stick cooking spray. Set aside. In a medium bowl, put the blueberries, sugar and lemon juice. Stir gently with a large spoon until all the blueberries are covered with the sugar and set aside. In large bowl, put the flour, baking powder, salt and one tablespoon of white sugar. Using two knives, "cut," in the shortening until it resembles coarse crumbs. Pour the milk in and with a large spoon mix well. On a lightly floured surface (about one tablespoon of flour), remove the dough from the large bowl and using your fingertips press out to nine inches. Pour the blueberry mixture into the pie pan and cover completely with the dough. Sprinkle the top evenly with one tablespoon of white sugar. Bake for 30-35 minutes or until the top starts to turn brown. Remove from oven and let cool. Top with whipped topping or ice cream or just as it is! Enjoy!

Friday, July 22, 2016

Zucchini Chili


We have had a "hot," spell here in Michigan! You would think the very last thing I would make for my family to eat would be chili! Well, Lauren only has about another month at home and then she goes back for her junior year of college. Ever since I started putting zucchini in my chili, she requests it often for dinner. I used to buy "chili ready," canned tomatoes until a few months ago I "discovered," that chipotle tomatoes add a really unique flavor. How about curry powder? I used to only associate that spice with Indian cooking. Well, oh my gosh, I have been adding a little to the chili and it bumps up the flavor to a whole different level!  The only "side effect," I seem to have from the curry powder is that it makes me sweat. I was fanning myself with a magazine last night at the dinner table and my hubby goes, "why are you doing that, we have the air conditioning on!" What my husband fails to realize is that women of my age sometimes have an "internal," heater that is on ALL the time!!!! LOL.

Ingredients:

1 1/2 pounds ground chuck
12-ounce package 3-pepper and onion blend,
   frozen
14.5 ounce can petite diced chipotle tomatoes,
   undrained
14.5 ounce can diced tomatoes, undrained
15.5 ounce can Great Northern Beans, drained
2 large zucchini, peeled and cubed
  (about two cups)
1.25 ounce package mild chili seasoning mix
1/2 teaspoon curry powder
2 cups water

In a large stockpot, brown meat and then drain off grease. Add the rest of the ingredients in the order given, mix well with a large spoon and bring to a boil. Turn down to simmer, cover with lid and cook 30 minutes or until the zucchini is soft, stirring occasionally. Serve over cooked rice or elbow noodles and top with shredded cheddar cheese (if desired). Makes 4-6 servings.

Sunday, July 10, 2016

Fresh Strawberry Smoothie

When I went grocery shopping last week, I forgot to pick up one of Dominic's favorite food items - chicken nuggets. Little by little, I am teaching him how to make his own meals. I have taught him to get the chicken nuggets bag out of the freezer, grab a plate, put 8-10 on the plate and then put it into the microwave. To say he was bummed out that I forgot would be an understatement. I have used the opportunity to come up with some different recipes. This afternoon, when he was telling me he was hungry for lunch, I said, "how about a strawberry smoothie?" He LOVES strawberries, but isn't so "gung-ho," about yogurt, he will absolutely REFUSE to eat it out of the container. Hmm, we moms sometimes have to get creative, so I figured a smoothie was a good way to give him the yogurt and the strawberries at the same time, with Dominic being none the wiser. LOL. Since this recipe makes three cups and both the hubby and Lauren had other plans this afternoon, I joined Dominic for our "strawberry smoothie," lunch! It was so yummy, there was not one drop left!!


Ingredients

6 ounce container Strawberry Greek Yogurt,
  any brand (I used Chobani)
6 ounce container Original Strawberry Yogurt,
  any brand (I used Yoplait)
1 cup fresh strawberries, sliced
2 cups ice

Put all ingredients into a blender and blend until desired consistency. Makes three cups. Super easy, huh?

Tuesday, June 21, 2016

"No-Churn" Vanilla Ice Cream


I could eat ice cream every day - that's how much I love it. I realized though, it's best to have it as a special treat - about once a month. I've thought from time to time about buying an ice cream machine, but then I probably would be eating it every day! LOL. This vanilla ice cream recipe doesn't require churning by hand or an ice cream machine. It does require an electric mixer though! My "dream," mixer is made by KitchenAid and is close to $700!! I do just fine and dandy with my hand mixer that was less than ten bucks from Bed, Bath and Beyond. Anyways, this ice cream is very rich, but oh my gosh is it DECADENT! I waited a few days after I made a batch before I went into the freezer to get myself a small bowl. About half the ice cream was already gone, so I was trying to figure out who the "culprit," was. One night that week I discovered it was my hubby. He had been going into the freezer, lifting off the top of the "Mason," jar and getting himself a spoonful at a time. I didn't know that, until I caught him, "red handed!"

Ingredients:
14-ounce can sweetened condensed milk
2 teaspoons vanilla extract
1 pint heavy whipping cream
1/4 cup sprinkles (if desired)
Directions:
Pour the sweetened condensed milk into a small bowl and add the two teaspoons of vanilla extract. Mix well with large spoon and set aside. In a large bowl, put the pint of heavy whipping cream. With an electric mixer, beat the whipping cream on high speed for about three minutes or until soft peaks form. Gently "fold" into the ingredients in the smaller bowl with a large spoon. Add the sprinkles at this point if you wish and mix well with large spoon. When well combined, pour into a loaf pan (8 1/2 x 4 1/2 x 2 1/2 inches) that is lined with parchment paper and then covered with plastic wrap (so ice crystals don't form) or use glass "Mason" jars. Put in freezer for a minimum of eight hours. Enjoy!

Sunday, June 5, 2016

Baked Kale Chips

Lauren has wanted me to make kale chips with her for a while. I didn't want to and always came up with some excuse why we couldn't. I even went so far as to buy a bag of raw kale two or three times with good intentions of making them. I ended up throwing the bag away because by the time the two of us had free time, it had gone bad.  About a month ago, Lauren and I made these. We experimented with a bunch of different "seasonings," like curry powder, lemon pepper and salt/pepper. We discovered that the Taste of Home California Garlic Pepper seasoning was an A+++++! I'm not just saying that because I am a Volunteer Field Editor for Taste of Home - I have used the seasoning on white rice, baked potatoes and steamed broccoli and cauliflower! Since I didn't take any pictures of the baked kale chips when we made them the first time, I decided to make some more "chips," today!  Raw kale by itself doesn't have a lot of flavor, so you really have to add at least a little salt and pepper if nothing else.  Here is a bunch of raw kale I bought at Kroger:


 Here is what it looks like after it is baked and seasoned - YUMMY!!!!!


You can put the kale into a green salad or add some dried cranberries, salted sesame seeds, walnuts or pecans and raisins and you have an awesome homemade "trail mix!" One important thing Lauren and I found out the first time we made these kale chips is that you have to eat them immediately or at least within a few hours after you make them for maximum freshness!


Ingredients

1 bunch raw kale
Non-stick cooking spray
Seasoning of your choice

Preheat oven to 350 degrees. Line two large cookie sheets with parchment paper. Set aside. Using a pair of kitchen shears, remove the "leaves" from the tough "stalks," of the entire bunch of kale. Cut into bite-size pieces, put into a medium bowl and then rinse with water. Dry thoroughly with a kitchen towel to remove all the excess water. Place a single layer of kale on the two cookie sheets. Spray liberally with the non-stick spray and then sprinkle with your favorite seasoning. Bake for 15-18 minutes or until they are starting to crisp up. Remove from oven and let them cool slightly. Enjoy!

Saturday, May 28, 2016

Peanut Butter/Oatmeal/Milk Chocolate Chip Cookies


I made a batch of peanut butter cookies about a week or so ago with melted milk chocolate chips on top and the hubby was like, "where are the peanut butter cookies with the chocolate?" Since I only had made about six cookies with the melted chocolate, I had to break the news to him they were long gone. I like to keep the hubby happy, so I made more of the peanut butter cookies with the addition of old fashioned oats, plus milk chocolate chips melted on top. My husband has been working hard today cleaning and power washing our back deck. He came in briefly for a little "break," and he saw the cookies on the tray and said, "can I have one?" I told him to help himself. I think he now has enough energy to finish his outside project!

Ingredients

18-ounce jar smooth peanut butter
2 large eggs, beaten
2 cups white sugar
1/2 cup oats, old fashioned

For Topping:

1 tablespoon white sugar
1 cup milk chocolate chips


Preheat oven to 350 degrees. In large bowl, put the peanut butter, eggs, white sugar and oats. Mix well by hand with large spoon until smooth. Put in fridge covered for an hour or if you are impatient like me, just go ahead and roll into 30 equal-sized balls (a little less than a size of a golf ball). The batter will be a little sticky. In a small bowl, put the one tablespoon of  white sugar. Place 12 balls on an ungreased cookie sheet and then with a fork, dip first in the white sugar and then press down in a criss-cross design. Bake for 16 minutes or until the cookies are starting to brown. Remove from oven and let them sit for five minutes on the cookie sheet and then remove to wire rack to continue to cool. When completely cool, put the one cup of chocolate chips either in a small saucepan on the stove and slowly melt, or put in a microwaveable bowl and start with 30 seconds and keep adding 15 seconds at a time until the chips are completely melted, stirring with a small spoon.  Spread evenly between the 30 cookies. Put sprinkles on top if desired. The cookies will keep up to three days covered at room temperature.

Saturday, May 14, 2016

Lemon Muffins with Lemon Glaze


I love going to the Dollar Tree around where I live.  It is the ONLY place I buy my greeting cards and colored sprinkles. I recently discovered they sell lemon juice. Yahoo! I could buy a bunch of lemons and squeeze the juice myself, but how much time would it take to squeeze 32 ounces?!?!?! More than I am willing to take, I can tell you that! I can always tell how much my family likes my, "bakery," by how long it takes them to wipe out muffins, scones, biscuits, etc. Just 48 hours ago, there were 12 lemon muffins, this morning there was one. Yep, these will definitely become a "regular item," in Cathy's Kitchen!

Ingredients

2 cups white flour
1 1/2 cups white sugar
2 teaspoons baking powder
1/4 teaspoon salt
1/4 cup unsalted butter, melted
2 large eggs, beaten
1/2 cup milk
3 tablespoons lemon juice
1 teaspoon vanilla extract

Lemon Glaze (optional)

1/4 cup powdered sugar
1 1/2 teaspoons lemon juice


Preheat oven to 375 degrees. Place paper liners in a 12-cup muffin tin. Set aside. In a large bowl, put the flour, white sugar, baking powder, salt, butter, eggs, milk, lemon juice and vanilla extract.  Mix well by hand with large spoon or with electric mixer until smooth. Distribute batter evenly between the 12 paper liners. Bake for 15-18 minutes or until a toothpick inserted into the middle of a muffin comes out clean. Remove to wire rack to continue cooling. Keep muffins covered at room temperature for up to three days. If desired, you can make a lemon glaze. In a small bowl, put the powdered sugar and lemon juice. Mix well with small spoon and then drizzle evenly between all the muffins! Enjoy!!

Saturday, April 30, 2016

Baked Cinnamon/Sugar Tortilla Chips


What if I told you that you could whip up a tasty treat for your friends and family in less than 30 minutes? I have been wanting to test out this recipe for YEARS. Yes, YEARS. The reason I had waited for so long was because I thought they were really hard to make or I needed to use a deep fryer. Well, these are not hard at all to make and you can bake them in your oven! Given that I had purchased a pack of flour tortillas earlier in the week at Kroger for just a $1.00, I knew it was time to give it a try, figuring if it was a disaster, I would have only spent a little over a buck (considering butter, sugar and cinnamon were also in the recipe). Much to my amazement, they turned out AMAZING!!!! Yeah! Since all of my chips from the first batch are gone, I guess I better go back to the Kroger and stock up on flour tortillas!


Ingredients

1/4 cup melted butter, unsalted
 10 8-inch flour tortillas
  (I used La Banderita soft taco flour tortillas)
2 tablespoons white sugar
1 teaspoon cinnamon

Preheat oven to 350 degrees. In the microwave or in a small saucepan on the stove, melt the butter. Set aside. Separate the 10 tortillas and on each tortilla put about 3 teaspoons of the melted butter on one side only, either spreading the butter with a pastry brush or with a teaspoon. Set aside. In a small bowl, put the white sugar and cinnamon and mix well with a small spoon. Sprinkle about 1/2 teaspoon of the cinnamon/sugar mixture evenly on top of each tortilla. With a pair of kitchen shears or using a knife, cut each tortilla into eight equal sized wedges (triangles). Place each wedge, cinnamon/sugar side up, on an ungreased cookie sheet. I used a 14-inch by 16-inch cookie sheet and could fit 24 wedges on it at a time. Bake for 10-12 minutes or until the tortillas are starting to crisp up. Remove from oven and transfer to wire rack to cool. Store in a covered container for up to two days. For maximum freshness consume within 24 hours!!!

Friday, April 22, 2016

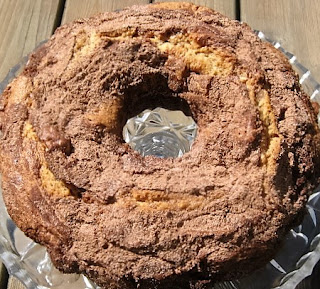
Double Chocolate Sour Cream Coffeecake


When I was about 12 years old, I had a baking event that is eternally etched in my memory. I was trying to remove a cake from a tube pan and most of the cake landed in a bowl of soapy water that was in the sink. I remember being devastated. I learned two important lessons that day - wait until an item in a tube pan is completely cool before trying to remove and don't EVER try and remove a cake from a pan while standing over a sink!!! I was so upset by that event, that it took me a very LONG time before I even wanted to attempt using a tube pan again (like a few decades). There is something "unique," though when you bake either a cake or coffeecake in a tube or "Bundt," pan. To me, it elevates your "bakery," to a whole different level! Yes, I could order one on-line, but how about making one?!?!?! From the outside, this coffeecake looks pretty good doesn't it?


You would never know in a million years, that inside the coffeecake, there are chocolate chips that have melted.


Oh, my. This coffeecake was out of this world - delicious! Dominic will pretty much eat anything that isn't nailed down these days - he is going through a HUGE growth spurt. Believe it or not, he won't eat anything with chocolate chips in it. When I handed him a piece of this coffeecake, he didn't even blink an eye and gobbled it down. He had no clue that his piece contained chocolate chips!!!! If you see Dominic, please don't tell him - it will be our little, "secret!" We moms always have a trick or two up our "sleeves."  LOL.

Ingredients


1/2 cup unsalted butter, softened
1 cup white sugar
2 large eggs, beaten
2 cups white flour
1 cup sour cream
1/2 teaspoon salt
1 teaspoon baking powder
1 teaspoon baking soda
1 teaspoon cinnamon
1 ½ teaspoons vanilla extract
1 cup semi-sweet chocolate chips


Topping:

1/2 cup white sugar
1 teaspoon cinnamon
2 tablespoons baking cocoa

Preheat oven to 350 degrees. Spray a 12-cup fluted tube or Bundt pan generously with non-stick spray. Set aside. In a large bowl, put the butter and white sugar and cream with an electric mixer or by hand with a large spoon until smooth. Add the eggs and mix well. Add the flour, sour cream, salt, baking powder, baking soda, cinnamon and vanilla extract. Mix by hand with a large spoon or with electric mixer until smooth. “Fold” in the semi-sweet chocolate chips until well incorporated with a large spoon. In a small bowl, put the white sugar, cinnamon and baking cocoa.  With a small spoon, mix together. Set aside. Take half of the mixture in the large bowl and pour into the prepared pan. Spread evenly. Sprinkle half of the topping mixture on top followed by the rest of the mixture in the large bowl. Sprinkle the other half of the topping mixture evenly on top. Bake for 40-45 minutes or until a toothpick inserted in the coffeecake comes out clean. Remove from oven and let the coffeecake cool on a rack. When cool, turn pan over and remove gently. Place on a large plate. Keep covered at room temperature for up to three days. Makes 10-12 servings.


Sunday, April 10, 2016

Peanut Butter Brownies with Peanut Butter Frosting


The hubby LOVES anything involving peanut butter. Sometimes he will even stick a spoon into the jar! Whenever a batch of peanut butter "criss-cross," cookies are around, they typically don't last too long around "Cathy's Kitchen." In all my years of baking brownies, I don't think I have ever made peanut butter brownies. Well, yesterday I rectified that. Wow, these brownies smell SO good while they were baking! I think that's one of the reasons why I love to bake so much - it makes our house smell AMAZING. Too bad you can't bottle those smells, isn't it? Anyways, I was so impatient waiting for these brownies to cool - it seemed like it took FOREVER. I have tried to frost cakes before they were cooled off and it's been a disaster - hunks of cake come up with the frosting on the knife - not a pretty picture. I was pretty good about waiting for the brownies to cool and then I added the frosting. Oh my goodness, these were pretty darn good, if I do say so myself! The hubby had a  "sample" after dinner last night. I didn't have to guess how he liked his piece, there wasn't a crumb left on the plate.

Ingredients

Brownies:

3 large eggs, slightly beaten
1 cup light brown sugar, firmly packed
1/2 cup white sugar
1/2 cup white flour
1/2 cup peanut butter, smooth
2 tablespoons unsalted butter, softened
1 teaspoon baking powder
1 teaspoon salt
1 1/2 teaspoons vanilla extract

Frosting:

1 cup powdered sugar
1/4 cup peanut butter, smooth
1/2 tablespoon unsalted butter, softened
1/4 teaspoon vanilla extract
2-3 tablespoons milk
1/4 cup mini semi-sweet chocolate chips
   (optional)

Preheat oven to 350 degrees. Spray a 8-inch square pan with non-stick spray. Set aside. In a large bowl, put the eggs, light brown sugar, white sugar and white flour. Combine well with large spoon. Add the peanut butter, butter, baking powder, salt and vanilla extract. Mix well until smooth by hand. Pour into prepared pan. Bake for 30-35 minutes or until a toothpick inserted into the middle of the brownies comes out clean and is golden brown. Remove pan to wire rack to cool. These brownies are awesome on their own, but if you want to make them even more yummy, make the frosting! In a small bowl, put the powdered sugar, peanut butter, butter and vanilla extract. Combine with large spoon. Add two tablespoons of milk and if too thick, add an additional tablespoon. If still too thick, add milk a teaspoon at a time until desired consistency. Frost brownies and sprinkle with the mini semi-sweet chocolate chips (if you want) and then cut into 9-12 squares. Store covered in fridge for up to three days.


Sunday, April 3, 2016

Ham and Cheese Frittata

I have known my stepson since he was six years old. When he was growing up and would come to our house, I would make him his very own "made-to-order omelet," for breakfast. He was very good for my ego, because he would tell me that I should open up my own restaurant! Cooking and baking for those that I love is certainly one of my passions.


After doing a little bit of research about what a frittata is, it's basically a baked omelet. My first attempt at a ham and cheese frittata yielded a nice looking product, but, oh my, it was so salty - guess I shouldn't have put a cup and a half of ham in - yikes. My second attempt turned out much better! Since cheese has been on sale at Kroger  lately, I had stocked up! I had Swiss, mozzarella and Colby Jack to choose from. My first frittata used Colby Jack and it was okay, but not quite the right flavor. Mozzarella didn't seem like the right cheese either - I guess I think of that as "pizza" cheese. Swiss was so yummy and it melted wonderfully!!


 My stepson has grown into a smart and handsome man and he and I still remain close. He is now 32 and engaged to a gal we all love! I can't wait for him and his future wife to visit us. I already know what will be on the "menu," for breakfast at "Cathy's Kitchen," a made-to-order frittata!


Ingredients

8 large eggs
1 cup cooked ham, chopped
1 cup Swiss cheese, shredded
1/4 teaspoon black pepper

Preheat oven to 350 degrees. Spray a 9 1/2 inch glass pie plate with non-stick spray and set aside. In a large bowl, put the eggs, ham, cheese and black pepper. Beat well with a fork or wire whisk until well combined. Pour into the prepared pan and bake for 30 minutes or until the frittata is starting to turn brown and the middle is cooked through. Remove from oven and let cool just a bit. Serves eight. Store covered in the fridge for up to three days.
Friday, March 25, 2016

Apple/Cheese and Walnut Bread


What do you do if you bought five pounds of apples that are all about the same size as a softball? You make apple bread, that's what you do!  One of my new found favorite things to eat is a slice of apple with a slice of Colby Jack cheese on top. D-E-L-I-C-I-O-U-S!!!! Of course, as one who likes to be a little daring with flavor combinations, how about if you took shredded cheese and apples, plus a handful of walnuts and made it into a bread??? All I can say is double D-E-L-I-C-I-O-U-S!!!! I decided to make the bread a little more "gourmet," by putting a little powdered sugar drizzle on top. Can you tell I'm the great-granddaughter of a baker?!?!?!? My dream "side" job would be to work in a bakery making quick breads all day! Ah, maybe one day.

Ingredients

1/2 cup unsalted butter, softened
1/3 cup white sugar
1/3 cup organic agave nectar
2 large eggs
2 cups white flour
1 teaspoon baking powder
1/2 teaspoon baking soda
1/2 teaspoon salt
1/2 teaspoon cinnamon
1/4 teaspoon nutmeg
1/2 teaspoon vanilla extract
1 1/2 cups peeled and shredded apples,
  (I used three large Jonagolds)
1/2 cup Colby Jack cheese, shredded
1/2 cup walnuts, chopped

Preheat oven to 350 degrees and spray a 8.5 x 4.5 x 2.5-inch loaf pan with non-stick cooking spray.  Set aside. In a large bowl, put the butter, white sugar, agave nectar, eggs, white flour, baking powder, baking soda, salt, cinnamon, nutmeg and vanilla extract. Mix well with large spoon. Peel and then shred the apple with a grater. Drain the juice from the shredded apples. I put the shredded apple in a 2-cup measuring cup and then put my fist on top and turned the measuring cup over and pushed down on the shredded apple (I did this over a cup and got six ounces of liquid)! Don't toss the liquid - you can drink it :) Next, add the cheese and then combine well. Gently "fold" in the walnuts and mix together. Pour into the prepared loaf pan and bake for 60-65 minutes or until a toothpick inserted into the middle comes out clean. Remove from oven and let cool on a baking rack for about 10-15 minutes before removing from pan to continue cooling on rack. If desired, you can make a drizzle - in a small bowl, put two tablespoons powdered sugar and 1/2 teaspoon water. Mix well and then with a small spoon, drizzle on top. Store covered at room temperature for up to three days. 

Wednesday, March 16, 2016

Snickerdoodle Scones


My husband and I have known each other over 25 years. I thought I knew just about everything there was to know about him!! Well about a year or so ago, he told me that he wasn't a fan of scones. It's not my particular scones, but just a scone in general. All this time, I thought he liked them!! I'm glad that we have such an honest relationship that he can tell me things like that. You know what that means then, right? More for the kids and I!!! LOL.


Ingredients

3 cups white flour
2 1/2 tablespoons white sugar
2 tablespoons light brown sugar
3 teaspoons baking powder
1/2 teaspoon salt
1 teaspoon cinnamon
1 teaspoon vanilla extract
6 tablespoons unsalted butter,
  (slightly softened)
1 cup milk

Topping

1 tablespoon white sugar
1/2 teaspoon cinnamon

Directions

Preheat oven to 375 degrees. Lightly grease a large cookie sheet with non-stick cooking spray. Set aside. In large bowl put the flour, white sugar, brown sugar, baking powder, salt, cinnamon and vanilla extract. Combine gently with a large spoon. "Cut" in the butter with two knives until it resembles coarse crumbs. Make a "well" in the middle and pour the milk in. Using your hands, mix the ingredients together and then remove to a lightly floured surface and flatten out to a circle that is 11 inches in diameter, either with the palms of your hands or with a rolling pin. Cut into eight equal triangles. In a small bowl, put the topping ingredients. Mix with a small spoon and then sprinkle evenly between the eight scones. Place on the cookie sheet and bake for 15-18 minutes or until the bottoms of the scones are turning lightly brown. Remove to wire rack to cool. Store in a covered container for up to three days.

Club Cracker Toffee

You know when you have a "taste" for something and until you eat it, you won't be satisfied? Late yesterday afternoon, I want...